The plastic grow pot that came with your plant from the nursery is a perfectly good home. It’s lightweight! It has drainage holes! Your plant is already thriving in there! Eventually, though, we may want something a little more permanent or something that fits in better with our ~vibe~.
Not to mention with all that good plant care you've been practicing, your plant will eventually out-grow their pot. Repotting (or "potting up") is a great opportunity to refresh and revitalize your plant…but, whatever you do, stay away from the rocks!
Things to Know Before Potting
To the new plant parent (and even the intermediate plant parent!), potting can seem quite daunting. Others talk about it like it’s NBD, but the idea of uprooting your plant baby can certainly bring on some anxiety. After all, your plant has been doing well in their home so far. You might think: why mess up a good thing?
But the time will come where you need to repot your plant. And when that time comes, we’re here for you. Let’s start with the basics and what you should know before you break out the tarp.
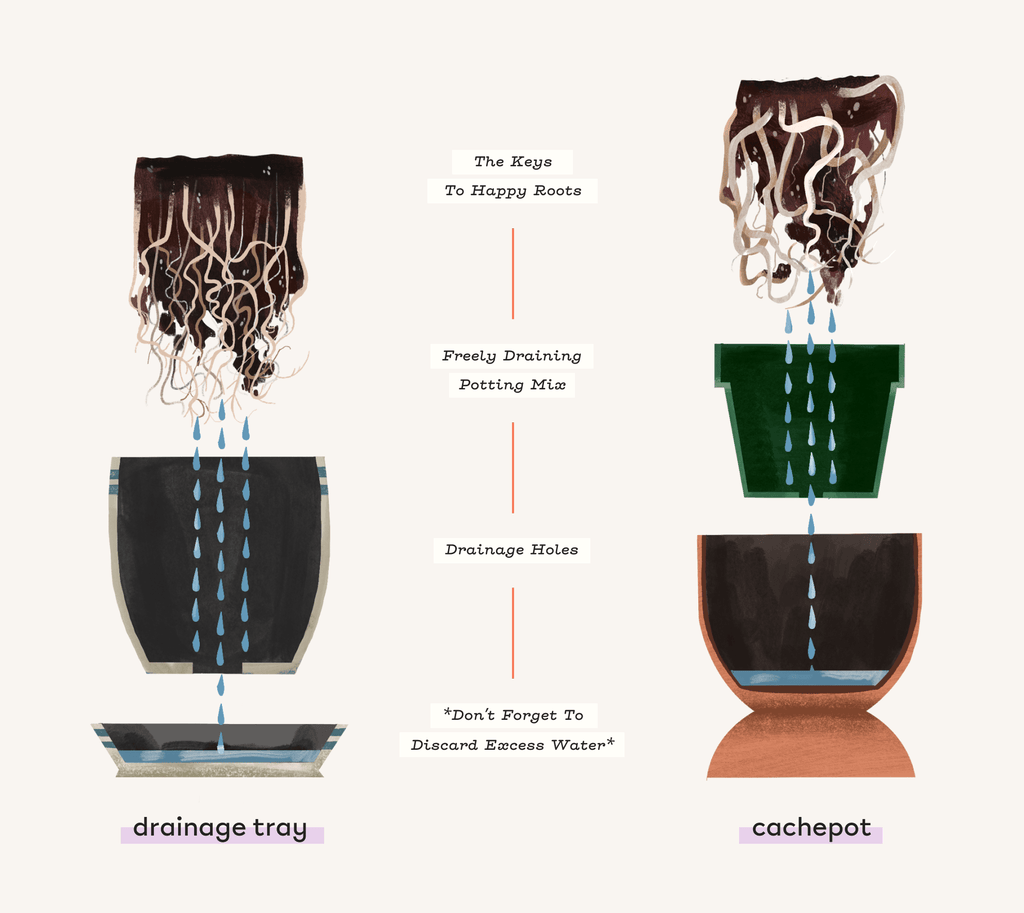
WHAT ARE CACHEPOTS?
First things first, let's talk pots. One special kind of pot is called a cachepot. This is a pretty home for your plant that conceals the more practical pot your plant is actually in. It’s a pot-in-a-pot! They are generally more decorative and don’t have drainage holes. The great thing about cachepots is that they can easily be swapped. So as soon as one plant moves out, another one can move in! And if you just like changing up your home decor, cachepots are perfect.
Cachepots don’t have to be what you’d think of as traditional pots. You can use a woven basket, a waxed canvas bucket, an old teapot, pretty much anything you can get your hands on! If it fits your plant’s actual pot, it’s a good contestant for a cachepot.
DO I NEED A DRAINAGE HOLE?
Yes. Absolutely, YESSS! If your pot doesn’t have a drainage hole, consider it a cachepot, okay. It is crucial to have a drainage hole so the water can get out of the pot somehow.
Otherwise, your plant can be susceptible to root rot, pests, disease, and eventually, death. Drainage holes are non-negotiable!
Think about plants in nature; most live directly in the ground. Water drains away from their roots, no problem. It seeps further into the ground and doesn’t allow it to sit close to the roots. When we bring the outdoors in, we must endeavor to match nature!

WAIT, WHY CAN’T I USE ROCKS TO CREATE DRAINAGE?
So, you’ve fallen in love with a pot that doesn’t have a drainage hole. You want to make it work. Sometimes, you will see ways to “make it work.” They’ll suggest things like:
- River rocks or pebbles at the bottom
- A layer of gravel and broken pottery
- Ping pong balls or packing peanuts (!!!)
Unfortunately, these solutions aren’t enough. The water-logged soil will still be right up against the roots.
Using coarse materials, like rocks, pottery, etc., in the bottom of your pot can lead to root rot, and ultimately, heartbreak for you and your plant.
Why is this the case? This is where something known as the Perched Water Table (PWT) comes into play. Simply put—this is an area of soil saturation, or the place where the most water is held. No matter the size of the pot, the PWT is the same level. When you put rocks in the pot, it's like making your pot smaller and truly just pushes the PWT up. This means less usable soil for the plant in the long run and soggy soil closer to the roots of your plant, which will inevitably lead to root rot. Plus, in the case of a bunch of rocks, you just made your planter super heavy.

Did we convince you yet? Good! Now that we're on board with drainage holes, what about a drainage tray?
DO I NEED A DRAINAGE TRAY?
Drainage trays, saucers, drip trays…they have many names. They also come in a few formats - there is the clear plastic kind, the terracotta kind that accompanies a typical terracotta pot, and there are the carefully crafted ones that a ceramicist designed just for its cute matching pot. But do you actually need one?
Well, yea, pretty much. A drainage tray collects all the extra water that seeps out of the plant’s pot through the drainage hole (because you WILL have a drainage hole 🙏). It protects your furniture and floors from said water. And it’s a great thing to have if you're into bottom watering. Just don't forget to discard the excess water! Or you'll be back to square one with your plant sitting in standing water. 😱
WHAT POTTING MIX DO I USE?
So when we say soil, what do we mean? Well it's a little tricky—"soil" in the colloquial sense doesn't really mean capital S, Soil. In fact, potting mixes are considered soil-less!
When you go to a garden center or nursery, potting mix is available in all shapes, sizes, and types. It can be overwhelming! Knowing a bit about what might be in the potting mix can help you narrow down your options and optimize for different plants. You can even make your own custom mixes. However, most indoor potting mixes will contain a combination of a few of these additions:
- Activated Charcoal: Heat treated charcoal, or activated charcoal, can absorb excess moisture and prevent fungal or bacterial growth. It can act as a defense to overwatering, but it’s not magic. You will often see this as a recommendation for pots without drainage, but you already know how we feel about that. 😤
- Pumice: This is a volcanic rock that has a bunch of tiny holes in it (from gas bubbles getting trapped as lava cools), making it a very lightweight and porous material. It helps with soil aeration, alleviates soil compaction, and improves drainage.
- Perlite: The tiny white balls that look a bit like styrofoam and you see in most potting mixes is perlite. It's a volcanic mineral that helps to aerate the soil and allows for swift drainage.
- Vermiculite: This is another volcanic mineral—a brownish flake that can feel kind of spongy. It helps retain moisture and enhances the structure of the soil, allowing for healthier roots.
- Orchid Bark: Often used in potting mix for orchids, but useful for many houseplants, these small shards of bark (usually fir or pine) provide plenty of aeration and improve drainage (the bigger the pieces, the greater the improvement). The bark itself can also hold quite a bit of water, improving overall moisture retention.
- Coir: The cast-off “hairs” from coconut husks. It helps retain water (up to 10 times what it weighs!) and increases aeration in the soil. It comes in a few different forms, like chips, pith, and more.
- Sphagnum Moss: This dried out moss is sponge-like and helps retain water but prevents sogginess. It’s often used on its own for air layering or as top dress (making the top of your soil look fancy).
- Peat Moss: This is sphagnum moss that has fallen into a peat bog and decayed. Even in this state, it retains its sponge-like qualities and holds on to water well. It's often used for sensitive plants or the developing roots in propagations.
Time to Repot?
Now that you are well versed in the background information of potting, it’s time to read the signs and see if you need to repot. Generally, your plants will give you one or more of these six indicators. We will go through all of these in more depth so you are confident before you proceed.
- Roots poking through drainage holes or out of the top of the soil.
- It seems like the plant is bulging out of the pot (more likely in plastic).
- The plant is getting top heavy and at risk of tipping over.
- The plant is so big that the base is taking up almost the entirety of the pot.
- Water may flow right through the soil or sit on the top of the soil.
- It seems like you have to water more frequently than ever before.

If you just brought a plant home from the nursery, it may be tempting to repot immediately. However, stop right there!
Repotting too soon after an environmental change can really stress a plant out.
So, give them a few weeks in their new environment to acclimate. You can always use cachepots if the grow pot is killing your vibe.
ROOTS TRYING TO ESCAPE
When you see roots poking out from drainage holes or the top of the soil [1], it’s a good indicator that the plant may be “rootbound.” While this sounds scary, it’s natural and expected. And if you catch it early on, it won't turn into an issue. Rootbound (sometimes also called "pot bound") simply means that the plant doesn’t have enough room to grow.
The roots will start to wrap themselves around and around the perimeter of the pot because they are trying to find somewhere to grow.
Another sign is when the plant literally starts to lift out of the pot by the roots [2]! It's usually more obvious in a plastic pot, but if you notice the container is starting to bulge out or the soil is bulging around the top, you'll know something's up. Some plants have even been known to go full on hulk and completely bust their way out of a container! Those are some strong roots! 💪
If you ignore a rootbound plant for too long, it can definitely turn into a problem. The roots will continue circling around, getting tangled, taking up so much room that there's no space for soil anymore. This can mean a plant gets easily dehydrated, misses out on essential nutrients, and stunts their growth.
If you notice roots getting unruly, it’s a good idea to repot that baby!
PLANT IS GETTING BIG
Your plant started out as a tiny lil one. Over time, you’ve ensured they have the best potting mix, that ~nice~ light, and the perfect amount of watering. They're loving life. In fact, they've grown so much that one day you brush past and nearly knock your baby over [3]. Or perhaps you go in to water and there's barely any visible soil or unoccupied space in the pot [4]. Your plant is all grown up!
If your plant is getting big, whether they're top-heavy or the pot is chock full of stems, they're ready for a new home. But hey, you should be proud!
UNEXPECTED WATERING
Fresh potting mix is packed full of the nutrients that your plant loves. However, it does run out of nutrients over time and the overall quality of the environment degrades. In nature, there are natural processes that take care of keeping the soil full of nutrients and well aerated. Think leaves and other matter decaying, worms digging through it, and more.
In our homes, we don’t have that going on, so eventually, the soil will need to be replaced.
If the soil is drying out at an unexpected rate [5] and it seems like water just flows right through without absorbing at all [6], then it might be time for a repot.
If water is sitting on the top of the soil, you may also need a repot. Over time and many waterings later, soil can compact, which prevents air (oxygen) from getting to the plant's roots—never a good thing and usually a recipe for disaster (root rot).
IT’S BEEN A WHILE
You got your plant…a while ago. Like, five years ago? And maybe you haven’t even thought twice about repotting. Well, it might be about time. Any of the above indicators (soil health, being rootbound, etc.) can go certainly unnoticed if you don't know what to look for. It’s considered best practice to repot most plants every few years or so.
There are some exceptions to this rule. Succulents don’t have the root complexity, so they don’t need to be repotted as often. And a very mature plant doesn’t need to be repotted as often as a new, rapidly growing plant.
How to Repot
You’re ready. You have determined it is time to repot your plant baby. Now…what?
GATHER ALL YOUR SUPPLIES
I don’t know if you guys watch cooking shows, but they’re always saying “mise en place.” This basically means have everything ready and in place before you begin. Well, we can apply that here as well. Plus, we just like saying it.
Sure, you can leave your plant lying there without a pot while you run around with dirt covered hands trying to find what you need next, but that seems stressful. So, MISE EN PLACE, people!
You will need:
- A new appropriately sized pot with drainage holes: Pick a pot that is slightly larger (about 1 to 2 inches larger) than the current pot. You don’t want to overwhelm your plant—plus, too much space makes it difficult to efficiently and evenly deliver water to the roots.
- Potting mix of your choice: Make sure you are using an appropriate potting material for your plant. Gather any soil additions you'd like to use.
- Hand Trowel: A hand trowel allows you to reach places easily for distributing soil.
- Scissors or Snips: Occasionally, some trimming is required. Best to have these on hand!
- Watering can: Your plant will need some water after the repotting is complete.
Optional:
- Gloves: Some of us don’t mind the dirt, but for those of us that would rather not get dirt under our nails, gloves help. Also, if you're dealing with a spine-y guy, you'll need gloves for sure!
- Tarp: Same for this one—if you're in a place you don't mind getting dirty, cool. If not, a tarp (or an old sheet or some newspaper) will make clean up much easier!
- Hori hori: If you have a particularly stubborn plant, a hori hori can help make the extraction process much easier. In a pinch, a bread knife will do.
- A coffee filter: This can be helpful if you’ve had problems in the past with a lot of soil coming out of your drainage holes. It can be any material that will allow water to easily pass through, but not soil—think cheesecloth or a bit of burlap.
GET READY!
You’ve got your supplies. You’ve got your plant. Now, it’s time for the action, right?! Not quite yet. 😇 Before you repot, we suggest a couple of things:
- Thoroughly water your plant and allow to dry a little before trying to repot. Depending on the size of your plant, this can be a few hours before. If a larger plant, you can water the day before. Repotting a totally saturated plant will be messy. Repotting a very dry plant can cause some trauma because the roots may be a bit brittle.
- If you’re using a terracotta pot, soak it in water. Unglazed terracotta can absorb water like a sponge. Which can ultimately be a good thing to prevent overwatering, but in this case you don’t want the pot to wick away water right when they've been moved. Soaking the pot completely overnight can help in the transition.
- If you are using an old pot, wash it thoroughly with mild soap and water or a heavily diluted bleach solution. The old soil may have left behind salt or mineral deposits. These can dehydrate your plant! There could also be lurking pests or disease if the previous occupant recently perished—give it a good scrub! 🧼
- It’s best to repot in a place that is relatively warm and that you don’t mind getting messy.
- If you can, do wait until spring to repot your plants. Many plants go dormant in the winter and grow slowly, or not at all. They are sensitive to big changes during dormancy.
Repotting in spring is when your plant is starting to wake up and will be strong enough to withstand a little change. Plus, you'll be giving them a welcome boost of fresh nutrients to fuel even more growth.
SET, GO!
Okay, nowww it’s time for the action. Everything is in place. If using terracotta, it’s been soaked. If using an old pot, it’s been cleaned. Take a deep breath. Let’s do this.
Step 1: Remove the Plant
Gently supporting the stem(s) of the plant with your hands, turn the plant on the side and slowly wiggle out of the pot. If they're stubborn, take your hori hori and dig around the perimeter of the pot. Now, try again.
Step 2: Remove Excess Soil
Gently tap off soil that is loose from the top, sides, and bottom of the root ball.
Step 3: Prune, If Needed
You don’t always have to do this step. If you have a healthy root system, you can probably skip this.
But if the plant was severely rootbound or you do see damaged roots (black and mushy), you'll want to trim those off to encourage healthy growth in your new pot.
If you also did some major pruning of the plant's foliage or want to maintain a smaller sized plant overall, you may want to trim back even healthy looking roots—generally we want the root system below to be well balanced with what's going on up top.
Step 4: Gently Untangle Roots
No matter what was going on with your plant, it’s always a good idea to untangle the outlying roots. If the roots aren't crazy thick and tangled, you can generally just move and massage them around to loosen everything up. If that's not working, you may need to return to step 3 and cut through those stubborn outer roots.
Step 5: Layer Soil in New Pot
This is where your optional coffee filter comes into play. If you’ve had problems with soil coming through your drainage hole, you can place a coffee filter at the bottom of the plant to keep the soil in. This is optional, though.
Now, layer soil into the bottom of your new pot. Depending on the size of the pot, you’ll need more soil. A good rule of thumb is to fill one-third of the way or enough to ensure the rootball will end up close to the top of the planter.
It’s important to find the “sweet spot”. You don’t want the plant to be too deep or sitting too far up. If they land about an inch under the lip, that should be just about right.
Step 6: Place Plant in Center of New Pot
Take your plant and place in the center of the new pot. Placing too far to one side or another may mean the roots won't have the proper space to grow out. If you gently turn the pot around or look from above, you’ll be able to tell if you centered properly.
Step 7: Fill New Pot with Soil
While supporting the plant with one hand, take your trowel and start filling the sides with soil. You can also use your hand or a small container if you’re short a trowel. Start filling in the soil and push it down just a little to get the soil loosely packed in. It’s not an exact science, but basically, you want to do enough packing for the plant to be fully supported, but you don’t want to pack it in so tight that the roots can’t breathe.
Step 8: Water
The hard part is over! Now, you just want to water your plant again to make sure that the soil settles well and the plant gets a good drink after being moved. If you do notice the soil shifting around a lot, you may want to fill in some spots or pack it a bit more.
Step 9: Monitor
Now that your plant is repotted, you should monitor how it’s doing. It is important not to fertilize immediately after repotting.
The fresh potting mix has plenty of nutrients, so you don't need to add more. In fact, you'll likely do more damage than good.
Plants that are recently repotted can be a little thirstier at first—they need the extra moisture to grow and adjust to their new home. They're also likely to be a bit more sensitive overall. So, try to keep them in the same spot they were before, and don’t overwhelm them with tons of light just yet.
You’re a Potting Pro
Now that you know all there is to know about potting, you’re basically a pro. You’ve learned that drainage holes are crucial, that rocks are a no-no, when and how to pot up, and so much more than you ever thought one could know about potting!
Houseplants simply can't be houseplants without their pots! Understanding the role pots play in your plant's day-to-day health and as they grow is essential to any happy houseplant home.
Leave a comment